Quick Start
Integrate with the WorkOS Directory Sync API.
In this guide, we’ll take you from learning about Directory Sync and POC-ing all the way through to building production-ready features fully integrated with the WorkOS Directory Sync API.
Sign in to your WorkOS account to see code examples pre-filled with your API keys and resource IDs.
This guide will show you how to:
- Create a new Directory in the WorkOS Dashboard
- Add Directory Sync to your app and fetch Directory resources
- Use webhooks to receive real-time events relating to Directory changes
To get the most out of this guide, you’ll need:
- A WorkOS account
- A directory from a Directory Provider that WorkOS supports
- Directory. A Directory stores information about an Organization’s user management system (i.e. Directory Provider).
- Directory User. A Directory User represents an Organization user that is active in an Organization’s Directory Provider.
- Directory Group. A Directory Group is a collection of Organization users, e.g. IT admins, HR, Database admins, etc. within a Directory.
The WorkOS Directory Sync API exclusively uses read-only operations. We will never mutate end-user directories.
The first step to connecting with a directory is creating an Organization in the WorkOS Dashboard. You will then be able to create a new Connection to your organization's directory. Let's start by creating one for development in your Sandbox Project – get provider specific instructions by selecting the Identity Provider you’re planning to use from the list below.
You can view and copy the unique identifier for the Directory Connection on the Directory page, once it has been set up. The id takes the form directory_*.
NEEDS_TO_ADD_DIRECTORY_PROVIDER_GUIDES
Let's add Directory Sync to your app to enable fetching Directory resources programmatically.
Install the SDK using the command below.
npm install @workos-inc/node
You can also download the workos-node source code from GitHub.
As a best practice, your WorkOS API key should be kept secret and set as an environment variable on process start. The SDK is able to read the key automatically if you store it in an environment variable named WORKOS_API_KEY; otherwise, you will need to set it manually. The Client ID should also be set dynamically based on the release environment.
WORKOS_API_KEY='sk_example_123456789' WORKOS_CLIENT_ID='client_123456789'
Get the details of an existing Directory User. Example use case: pre-populate user attributes for new user accounts.
Get the details of an existing Directory User.
const { WorkOS } = require('@workos-inc/node'); const workos = new WorkOS(process.env.WORKOS_API_KEY); const directoryUserID = ''; // ... The ID of the Directory User to fetch const user = await workos.directorySync.getUser(directoryUserID);
Example use case: Pre-populate user attributes for new user accounts.
Subscribe your app to changes in Directories by registering incoming webhooks to receive Directory Sync events.
There is currently no rate limiting on event deliveries.
{ "id": "wh_01FKJ843CVE8F7BXQSPFH0M53V", "data": { "object": "directory", "external_key": "UWuccu6o1E0GqkYs", "name": "Foo Corp's Directory", "organization_id": "org_01EZTR6WYX1A0DSE2CYMGXQ24Y", "id": "directory_01EHWNC0FCBHZ3BJ7EGKYXK0E6", "state": "active", "type": "generic scim v2.0", "created_at": "2021-06-25T19:07:33.155Z", "updated_at": "2021-06-25T19:07:33.155Z", "domains": [ { "object": "organization_domain", "id": "org_domain_01EZTR5N6Y9RQKHK2E9F31KZX6", "domain": "__foo-corp.com__" } ] }, "event": "dsync.activated" }
Example use case: Prepare an organization to receive updates of groups and users.
{ "id": "wh_02FKJ843CVE8F7BXQSPFH0M53V", "data": { "object": "directory", "external_key": "UWuccu6o1E0GqkYs", "name": "Foo Corp's Directory", "organization_id": "org_01EZTR6WYX1A0DSE2CYMGXQ24Y", "id": "directory_01EHWNC0FCBHZ3BJ7EGKYXK0E6", "state": "inactive", "type": "generic scim v2.0", "created_at": "2021-06-25T19:07:33.155Z", "updated_at": "2021-06-25T19:07:33.155Z", "domains": [ { "object": "organization_domain", "id": "org_domain_01EZTR5N6Y9RQKHK2E9F31KZX6", "domain": "__foo-corp.com__" } ] }, "event": "dsync.deactivated" }
Example use case: Remove the organization's teams and its users from your application or mark them as deactivated.
{ "id": "wh_03FKJ843CVE8F7BXQSPFH0M53V", "data": { "object": "directory", "id": "directory_01EHWNC0FCBHZ3BJ7EGKYXK0E6", "organization_id": "org_01EZTR6WYX1A0DSE2CYMGXQ24Y", "type": "generic scim v2.0", "state": "deleting", "name": "Foo Corp's Directory", "created_at": "2021-06-25T19:07:33.155Z", "updated_at": "2021-06-25T19:07:33.155Z" }, "event": "dsync.deleted" }
Example use case: Remove the organization's teams and its users from your application or mark them as deleted.
{ "id": "wh_07FKJ843CVE8F7BXQSPFH0M53V", "data": { "id": "directory_user_01E1X1B89NH8Z3SDFJR4H7RGX7", "directory_id": "directory_01ECAZ4NV9QMV47GW873HDCX74", "idp_id": "8931", "emails": [ { "primary": true, "type": "work", "value": "veda@__foo-corp.com__" } ], "first_name": "Lela", "last_name": "Block", "username": "veda@__foo-corp.com__", "state": "active", "created_at": "2021-06-25T19:07:33.155Z", "updated_at": "2021-06-25T19:07:33.155Z", "custom_attributes": { "department": "Engineering" }, "raw_attributes": {} }, "event": "dsync.user.created" }
Example use case: Create a new user account and immediately send them a "Getting started" email.
{ "id": "wh_08FKJ843CVE8F7BXQSPFH0M53V", "data": { "id": "directory_user_01E1X1B89NH8Z3SDFJR4H7RGX7", "directory_id": "directory_01ECAZ4NV9QMV47GW873HDCX74", "idp_id": "8931", "emails": [ { "primary": true, "type": "work", "value": "veda@__foo-corp.com__" } ], "first_name": "Veda", "last_name": "Block", "username": "veda@__foo-corp.com__", "state": "active", "created_at": "2021-06-25T19:07:33.155Z", "updated_at": "2021-06-25T19:07:33.155Z", "custom_attributes": { "department": "Engineering" }, "raw_attributes": {}, "previous_attributes": {} }, "event": "dsync.user.updated" }
Example use case: Update a user's profile to reflect changes to attributes such as their name or job title.
{ "id": "wh_09FKJ843CVE8F7BXQSPFH0M53V", "data": { "id": "directory_user_01E1X1B89NH8Z3SDFJR4H7RGX7", "directory_id": "directory_01ECAZ4NV9QMV47GW873HDCX74", "idp_id": "8931", "emails": [ { "primary": true, "type": "work", "value": "veda@__foo-corp.com__" } ], "first_name": "Lela", "last_name": "Block", "username": "veda@__foo-corp.com__", "state": "inactive", "created_at": "2021-06-25T19:07:33.155Z", "updated_at": "2021-06-25T19:07:33.155Z", "custom_attributes": { "department": "Engineering" }, "raw_attributes": {} }, "event": "dsync.user.deleted" }
Example use case: Flag the user's account for deactivation or deletion.
{ "id": "wh_44FKJ843CVE8F7BXQSPFH0M53V", "data": { "id": "directory_group_01E1X5GPMMXF4T1DCERMVEEPVW", "idp_id": "02grqrue4294w24", "directory_id": "directory_01ECAZ4NV9QMV47GW873HDCX74", "name": "Developers", "created_at": "2021-06-25T19:07:33.155Z", "updated_at": "2021-06-25T19:07:33.155Z", "raw_attributes": {} }, "event": "dsync.group.created" }
Example use case: Populate a new team in your application.
{ "id": "wh_54FKJ843CVE8F7BXQSPFH0M53V", "data": { "id": "directory_group_01E1X5GPMMXF4T1DCERMVEEPVW", "idp_id": "02grqrue4294w24", "directory_id": "directory_01ECAZ4NV9QMV47GW873HDCX74", "name": "Developers", "created_at": "2021-06-25T19:07:33.155Z", "updated_at": "2021-06-25T19:07:33.155Z", "raw_attributes": {}, "previous_attributes": {} }, "event": "dsync.group.updated" }
Example use case: Update the team’s profile to reflect changes to attributes such as name.
{ "id": "wh_04FKJ843CVE8F7BXQSPFH0M53V", "data": { "directory_id": "directory_01ECAZ4NV9QMV47GW873HDCX74", "user": { "id": "directory_user_01E1X56GH84T3FB41SD6PZGDBX", "idp_id": "2936", "emails": [ { "primary": true, "type": "work", "value": "eric@__foo-corp.com__" } ], "first_name": "Eric", "last_name": "Schneider", "username": "eric@__foo-corp.com__", "state": "active", "created_at": "2021-06-25T19:07:33.155Z", "updated_at": "2021-06-25T19:07:33.155Z", "custom_attributes": { "department": "Engineering" }, "raw_attributes": {} }, "group": { "id": "directory_group_01E1X5GPMMXF4T1DCERMVEEPVW", "name": "Developers" } }, "event": "dsync.group.user_added" }
Example use case: Upgrade the user’s application permissions based on the group they’ve been added to.
{ "id": "wh_05FKJ843CVE8F7BXQSPFH0M53V", "event": "dsync.group.user_removed", "data": { "directory_id": "directory_01ECAZ4NV9QMV47GW873HDCX74", "user": { "id": "directory_user_01E1X56GH84T3FB41SD6PZGDBX", "idp_id": "2936", "emails": [ { "primary": true, "type": "work", "value": "eric@__foo-corp.com__" } ], "first_name": "Eric", "last_name": "Schneider", "username": "eric@__foo-corp.com__", "state": "active", "created_at": "2021-06-25T19:07:33.155Z", "updated_at": "2021-06-25T19:07:33.155Z", "custom_attributes": { "department": "Engineering" }, "raw_attributes": {} }, "group": { "id": "directory_group_01E1X5GPMMXF4T1DCERMVEEPVW", "name": "Developers" } } }
Example use case: Downgrade the user’s application permissions based on the group they’ve been removed from.
{ "id": "wh_06FKJ843CVE8F7BXQSPFH0M53V", "data": { "id": "directory_group_01E1X5GPMMXF4T1DCERMVEEPVW", "idp_id": "02grqrue4294w24", "directory_id": "directory_01ECAZ4NV9QMV47GW873HDCX74", "name": "Developers", "created_at": "2021-06-25T19:07:33.155Z", "updated_at": "2021-06-25T19:07:33.155Z", "raw_attributes": {} }, "event": "dsync.group.deleted" }
Example use case: Delete the team from your application.
Webhooks should use HTTPS and expect to receive POST requests with the following headers:
WorkOS sends the header as WorkOS-Signature, but many web servers will normalize all HTTP request headers to their lowercase variants. In this case, you’ll extract the workos-signature header.
See example approaches for implementing a webhook endpoint below.
const express = require('express'); const app = express(); app.use(express.json()); app.post('/webhook', (req, res) => { const payload = req.body; const sigHeader = req.headers['workos-signature']; // Verify the signature and process the event res.status(200); });
Set and save the webhook URL in the WorkOS Dashboard, so WorkOS knows where to deliver events.
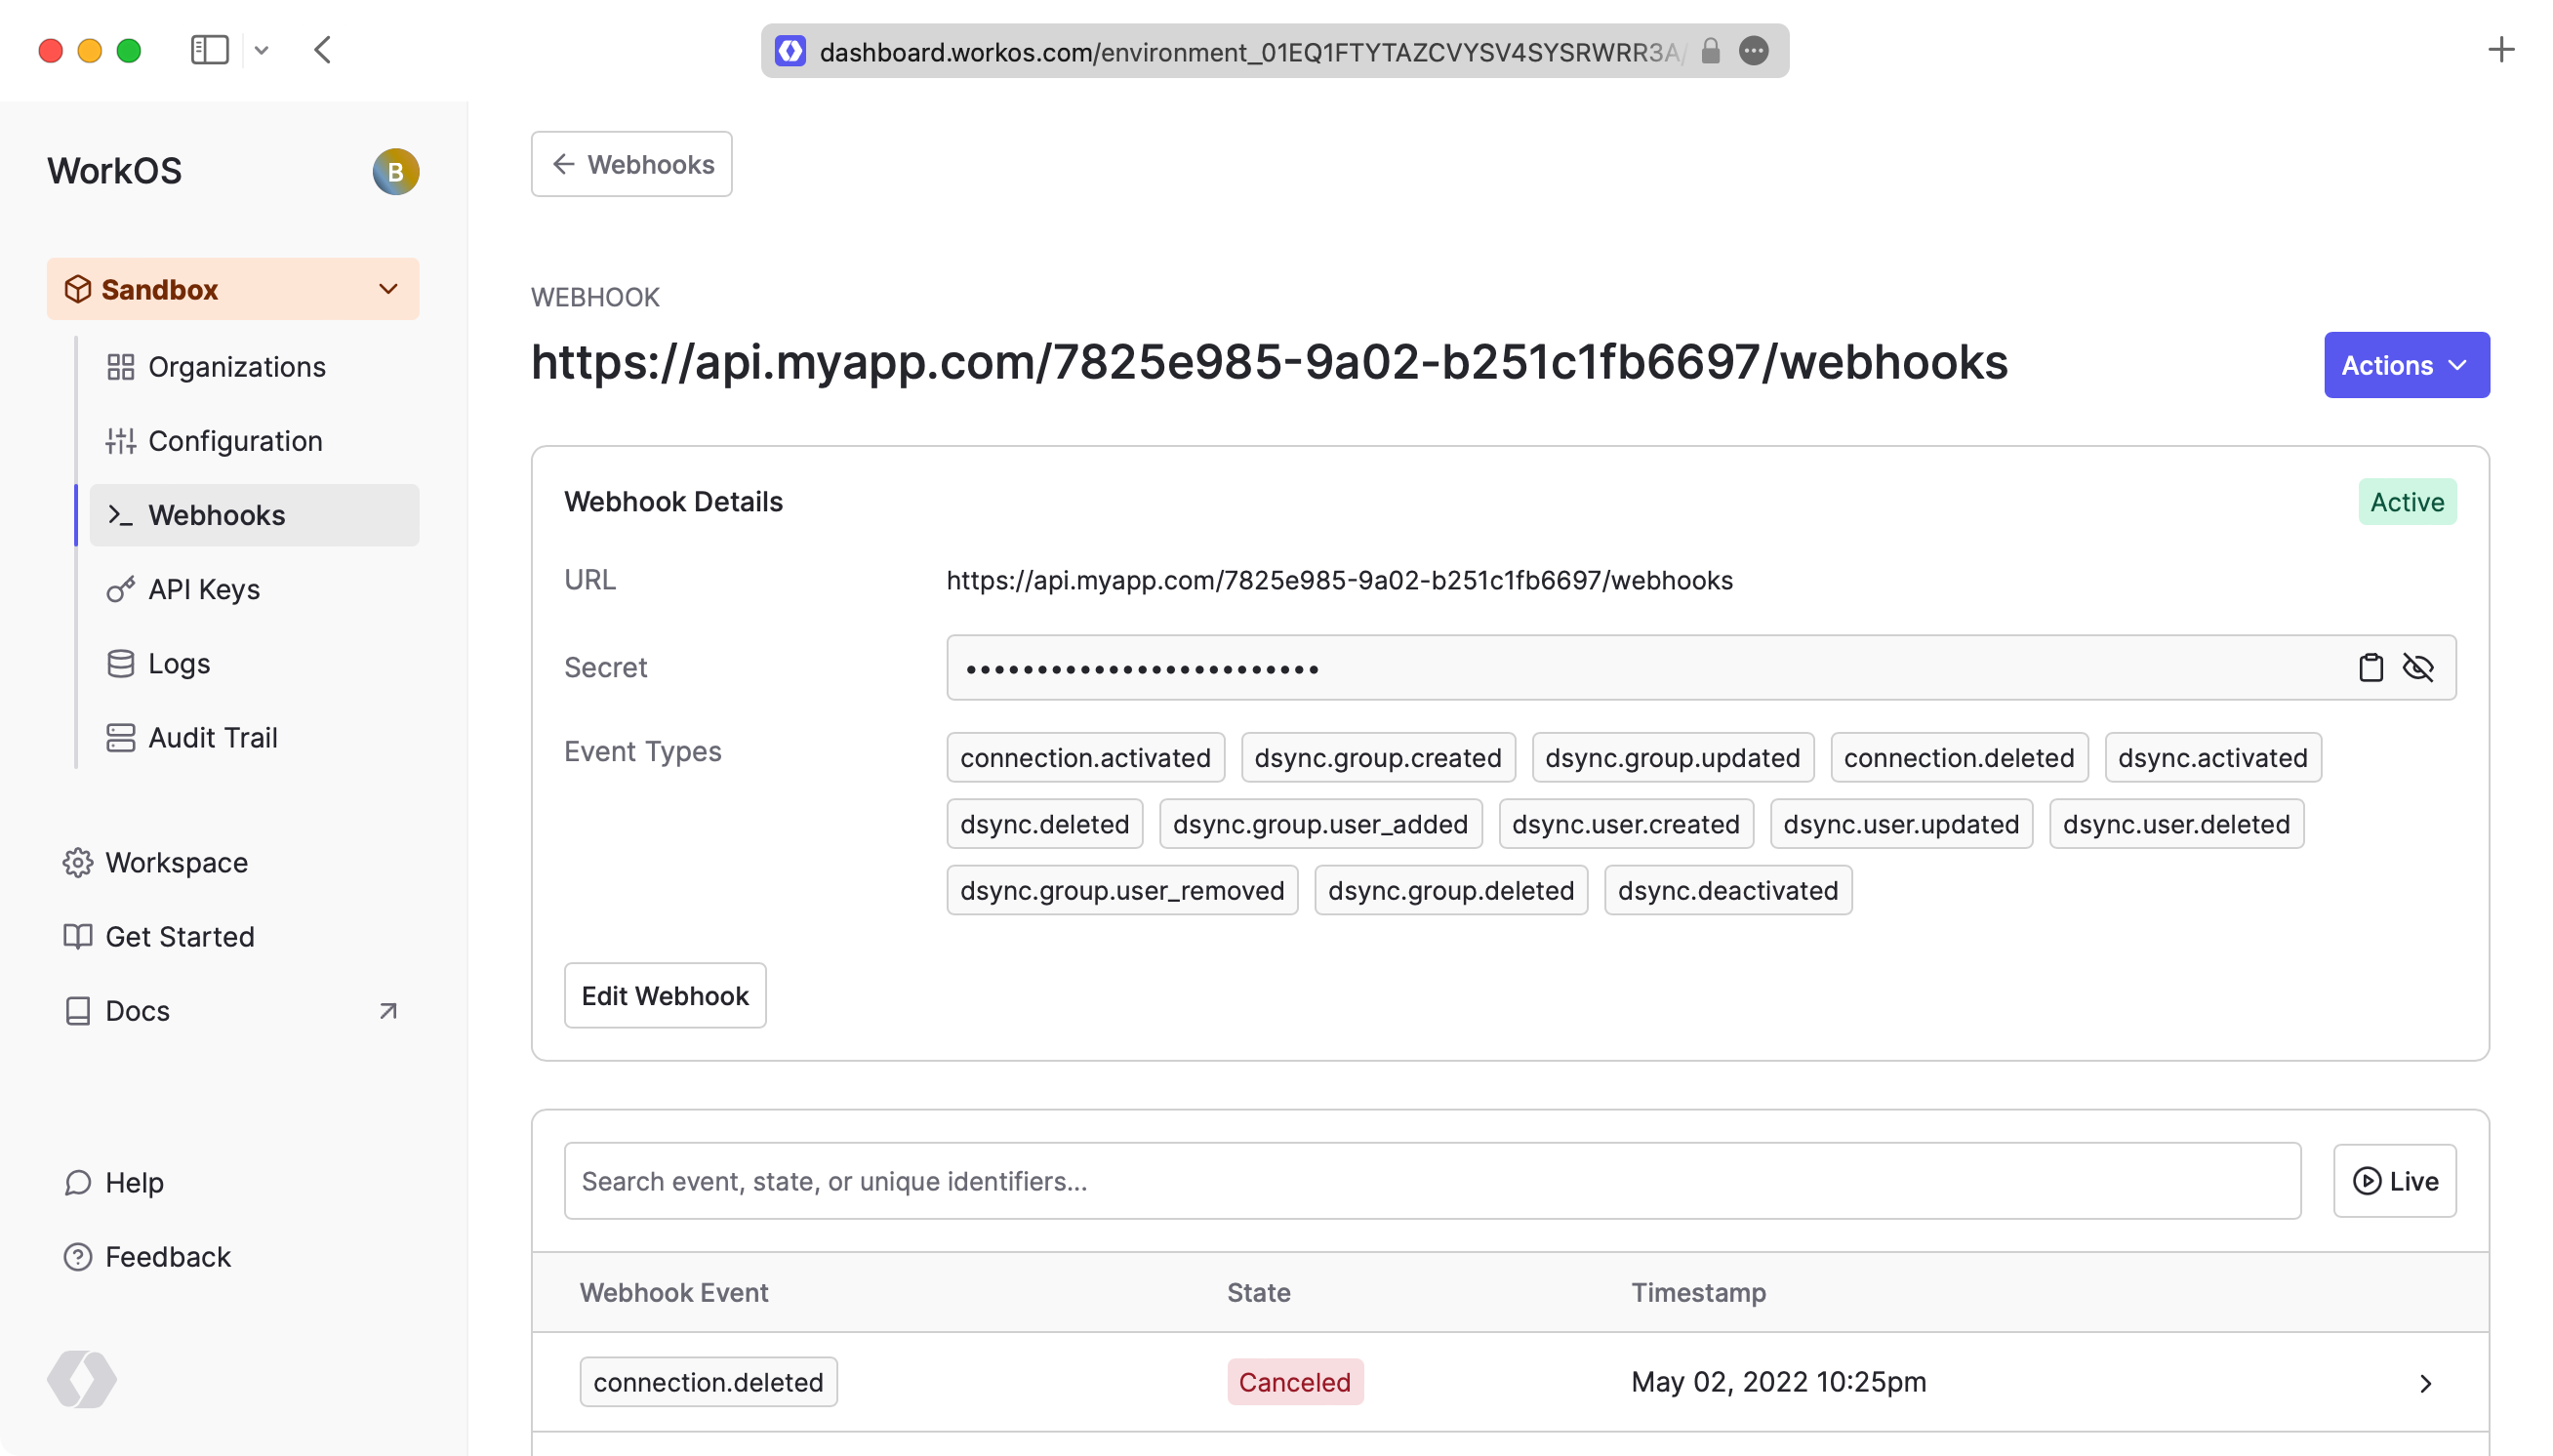
The Webhook Secret is used to verify webhook requests from WorkOS. Be sure to keep the value secure.
In order to avoid unnecessary retry requests hitting your webhook handler, we recommend using two concurrent processes for handling events: one for receiving the event, and the other for processing it.
Process A: Respond with HTTP 200 OK
On receiving an event, you should respond with an HTTP 200 OK to signal to WorkOS that the event was successfully delivered. Otherwise, WorkOS will consider the event delivery a failure and retry up to 12 times, with exponential backoff over 3 days.
Process B: Process the request
Before processing the request payload, verify the request was sent by WorkOS and not an unknown party.
WorkOS includes a unique signature in each webhook request that it sends, allowing you to verify the authenticity of the request. In order to verify this signature, you must obtain the secret that is generated for you when you set up your webhook endpoint in the WorkOS dashboard. Ensure that this secret is stored securely on your webhook endpoint server as an environment variable.
The WorkOS SDKs have methods for validating the timestamp and signature of a webhook. Examples using these methods are included below. The parameters are the payload (raw request body), the WorkOS-Signature header, and the Webhook Secret. There is an optional parameter, tolerance, that sets the time validation for the webhook in seconds. The SDK methods have default values for tolerance, usually 3-5 minutes.
import WorkOS from '@workos-inc/node'; const workos = new WorkOS(process.env.WORKOS_API_KEY); const webhook = workos.webhooks.constructEvent({ payload: payload, sigHeader: sigHeader, secret: process.env.WEBHOOK_SECRET, });
If implementing webhook validation yourself, you’ll need to use the following steps:
First, extract the timestamp and signature from the header. There are two values to parse from the WorkOS-Signature, delimited by a , character.
issued_timestamp: The number of milliseconds since the epoch time at which the event was issued, prefixed byt=signature_hash: The HMAC SHA256 hashed signature for the request, prefixed byv1=
To avoid replay attacks, we suggest validating that the issued_timestamp does not differ too much from the current time.
Next, construct the expected signature. The expected signature is computed from the concatenation of:
issued_timestamp- The
.character - The request's body as a utf-8 decoded string
Hash the string using HMAC SHA256, using the Webhook Secret as the key. The expected signature will be the hex digest of the hash. Finally, compare signatures to make sure the webhook request is valid.
Once you've determined the event request is validly signed, it's safe to use the event, i.e. the request body, in your application's business logic. You do not need to signal to WorkOS whether or not the event was processed successfully.